Adding SMS interactions
|
➢
|
To add an SMS Interaction Setting: |
|
1.
|
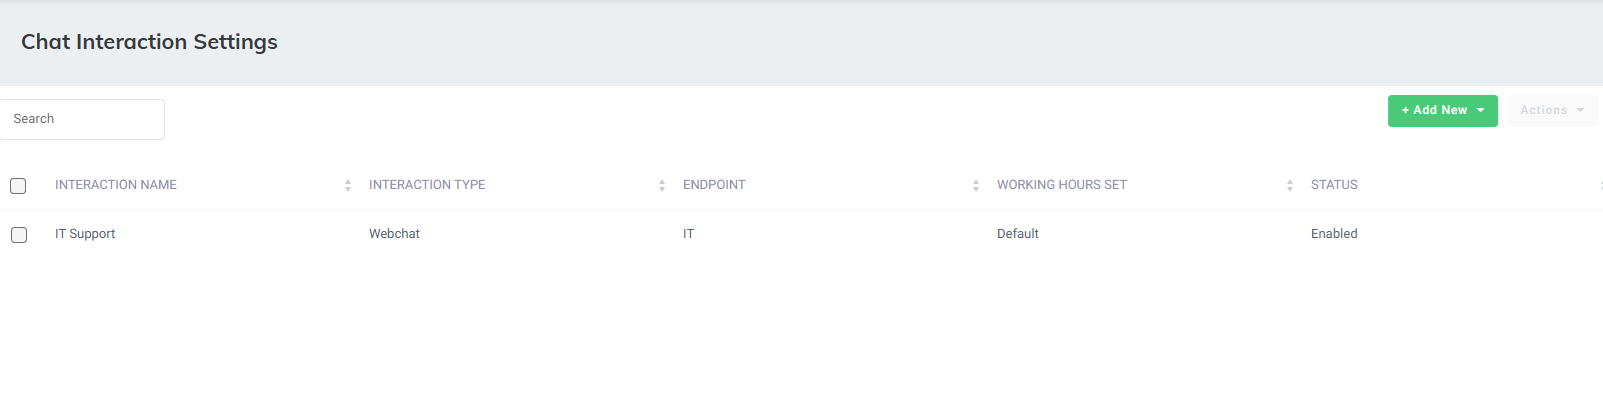
Open the Chat Settings page (Configuration > Interaction Manager > Chat); the following appears: |
|
2.
|
Click Add New, and choose +SMS Interaction. |

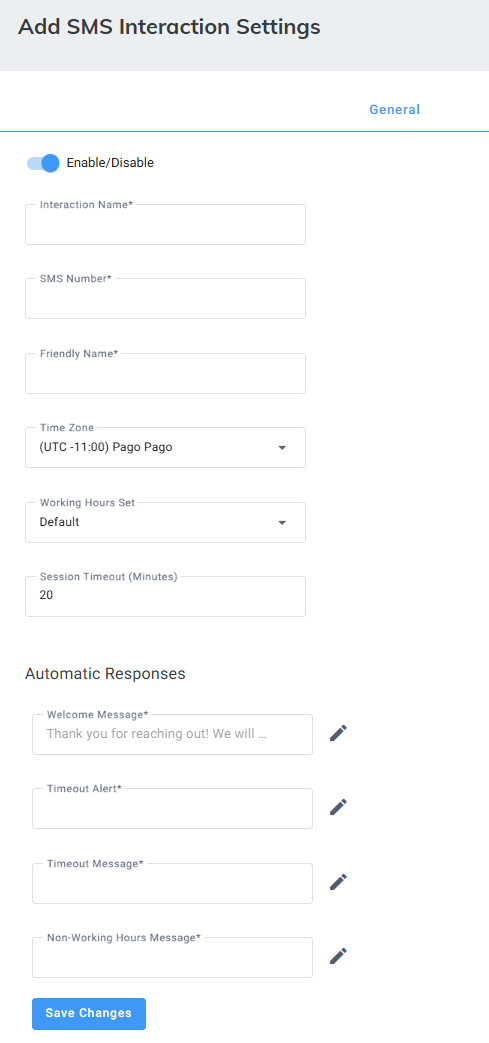
The following appears, with the General tab displayed by default:
|
3.
|
Under the General tab, do the following: |
|
a.
|
Click the ‘Enable/ Disable’ toggle switch to enable the SMS interaction. |
|
b.
|
In the ‘Interaction Name’ field, type the name of the interaction. |
|
c.
|
In the ‘SMS Number’ field, type the phone number that receives the SMS messages. This phone number connects between the SMS inbox settings and the customer's interaction. |
This SMS number must be supported by the SMS service provider.
|
d.
|
In the 'Friendly Name' field, type The name that will be presented to the customer when they receive the SMS interaction. |
The friendly name may not be supported in some countries due to local regulations. In some cases, SMS providers may block it, displaying the number instead of the name.
|
e.
|
From the 'Time Zone' drop-down list, select the timezone associated with the SMS interaction. When interacting with this SMS , working hours, holidays and events are checked based on the timezone. |
|
f.
|
From the ‘Working Hours Set’ drop-down list, select a working hour set to define the working / non-working days and time for the SMS interaction. |
|
g.
|
In the ‘Session Timeout (Minutes)’ field, define the time that a customer must respond to an agent before the session is automatically closed. |
|
h.
|
Under the Automatic Responses group, define automatic messages for different scenarios: |
|
◆
|
'Welcome Greeting' field: Greet the customer when starting a new conversation. |
|
◆
|
'Timeout Alert': Notify the customer that the session is about to be closed because no response has been received. |
|
◆
|
'Timeout Message': Notify the customer that the session has been closed because of inactivity. |
|
◆
|
'Non-Working Hours Message': Notify the customer that the chat is currently unavailable because it's outside of working hours. |
|
4.
|
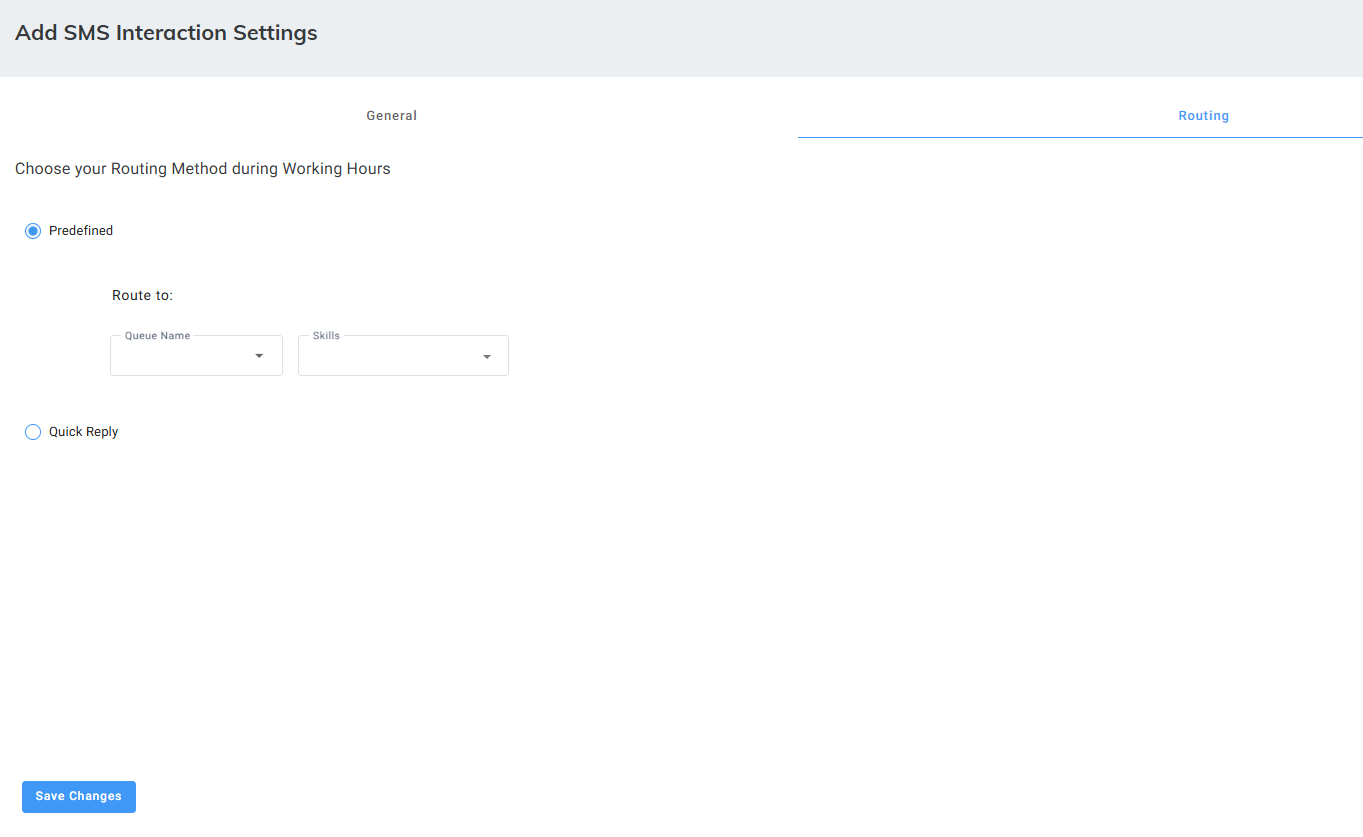
Select the Routing tab to choose where customers will be routed to when sending an SMS to this number. There are two options: |
|
●
|
Predefined - Select this to choose where all messages that are sent to this SMS number will be routed to. |
|
●
|
Quick Reply - Select this to create a tiered menu system. This allows customers to select their contact reason and any sub-reasons, and they will be routed to the appropriate queue. |
|
5.
|
If you selected Predefined, the following appears: |
|
a.
|
Under Route to, from the 'Queue Name' field, select the queue. |
|
b.
|
From the 'Skill's drop down list, select the specialized skills associated with this queue. |
|
6.
|
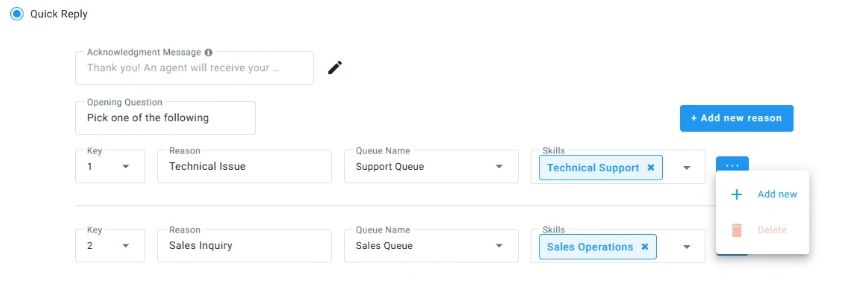
If you selected Quick Reply, the following appears: |

|
a.
|
In the 'Acknowledgment Message' field, click the edit icon, and enter a message that will be sent to the caller after they complete the selecting all the menu options, to notify the customer that an agent will receive their message shortly and get back to them soon. |
|
b.
|
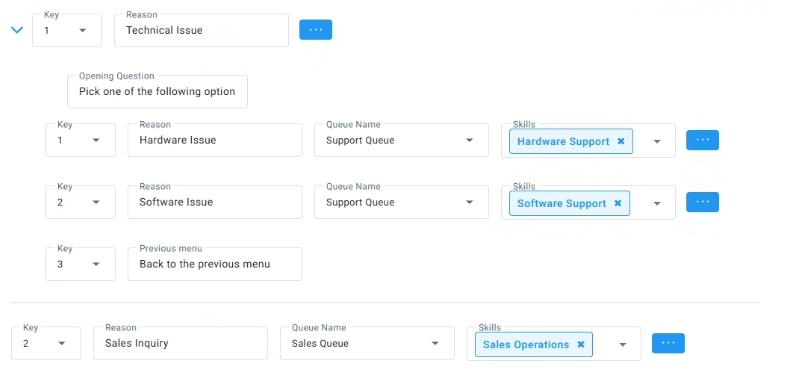
From the 'Key' field, select the number the customer should press to select a specific option. The example shows '1' and '2' for the first two options. |
|
c.
|
In the 'Reason' field, enter the text that corresponds to the key. This is what the customer will see as an option (for example, "Technical Support", "Sales Inquiry"). |
|
d.
|
From the 'Queue Name' drop down, select the queue where messages should be routed if the customer chooses this option. |
|
e.
|
From the 'Skills' drop down, select any specific skills required by agents in the chosen queue to handle this type of inquiry. |
|
f.
|
Add one or more sub-reasons that appear when the customer selects a specific option. For example, if they press 1, they will see another sub-menu with additional options to refine their contact reason: |
|
i.
|
Click the three dots on the side. |
|
iii.
|
Enter the following details for the sub-reason: Key, Reason, Queue Name, and Skills for the additional reason. |
|
iv.
|
When complete, configure a key and instructions for returning to the previous menu. |
|
g.
|
If you need to add more options, click the "+ Add new reason" button and repeat the steps for each additional option. |